Photo Filters With Core Image in Swift
Photo Filters With Core Image in Swift
Introduction : The Power of the Core Image Framework
Core Image is an image processing and analysis technology designed to provide near real-time processing for still and video images in iOS and OS X Apple has made a few great pre-made photo effects that you can easily use for your photography apps, with names such as Instant, Process, Sepia, Tonal, etc.
There are a wide range of built-in filters available through the Core Image API such as:
CICategoryBlur
CICategoryColorAdjustment
CICategoryColorEffect
CICategoryCompositeOperation
CICategoryDistortionEffect
CICategoryGenerator
CICategoryGeometryAdjustment, etc.
The view of the app is shown as in fig(i)

Fig(i)
The app compromises of the following:
- UIButtons
- UIImages
- Scroll View
The following steps are to be followed by the user in order to apply filters to chosen images.
Step 1: Accessing the Gallery
The code for accessing the gallery of the iPhone through the app is as follows:

fig(ii): Code for accessing gallery

fig(iii)
Step 2 : Applying the Filters
Currently I have used the following Core Image Filters which come under CICategoryColorEffect :
- CIPhotoEffectChrome
- CISepiaTone
- CIPhotoEffectTransfer
- CIPhotoWffectTonal
- CIPhotoEffectProcess
- CIPhotoEffectNoir
- CIPhotoEffectInstant
- CIPhotoEffectFade
I have inserted a row of buttons by using 'for' loop that will duplicate a custom UIButton inside the horizontal scroll view in order to access various filters.

fig(iv): Array of filters

fig(v): Code for inserting ‘Filter buttons’
Adding image to the 'Filter Buttons' and applying the filters is explained in the following code :
Here we initialise a CIContext and CIImage to let Core Image work on originalImage (picture.jpg) that each button will show. Then we init a filter variable of type CIFilter that will be called by each button through the for loop based on the CIFilterNames array.
CIImage is a representation an image to be processed or produced by Core Image Filters. CIContext is an evaluation context for rendering image processing results and performing image analysis

fig(vi): Code for adding filters to buttons

fig(vii)
After running the above code the app looks as depicted in fig(vii).
Below are few images after applying filter to the chosen image.

fig(viii)
Step 3 : Cropping the Image
The user has the feasibility to crop the image to cut out the desired area of the input image and returns an image of the cropped size.
The code for cropping an image is as follows :

fig(ix): Code for cropping of image

fig(x): Cropped Images
Step 4 : Saving the Image
On clicking the save button an alert appears which shows two options. Either to compress and save the image or to save the original image in below figure fig(xi)

fig(xi)
Step 4.1 : Compressing and Saving the Image
The user also has the feasibility to compress the size of the image to a static value of(both height and width) 320.
The code for compressing an image is as follows:

fig(xii)
The following is the code to save a compressed image:

fig(xiii)
The size to which the image has been compressed can be seen in the debugger region.
Step 4.2 : Saving the Original Image
The code to save the filtered image instead of compressing is as follows :

fig(xiv)
On saving the image an alert message pops up asking for permission to access the iPhone’s gallery as shown below. On giving permission, the image is saved into the gallery and can be found in the iPhone’s gallery.
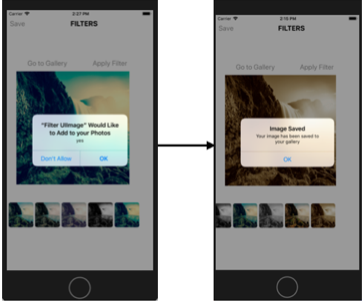
fig(xv)
The following are the filtered images saved in the gallery.

fig(xvi): Images in Gallery of iPhone
Conclusion:
This article is an introduction to Core Image, a framework for high-performance image processing. I have tried to cover some features of the framework as practically as possible in this project. I have learned how to instantiate and wire together Core Image filters and tune parameters to get the desired outcome. I also learned how to access the system-provided photo filters, which can emulate the behaviour of the Photos app on iOS.
With a little more exploration, I will be able to write my own filters that exploit the amazing power of unimagined effects.
Wonderful blog.
ReplyDelete